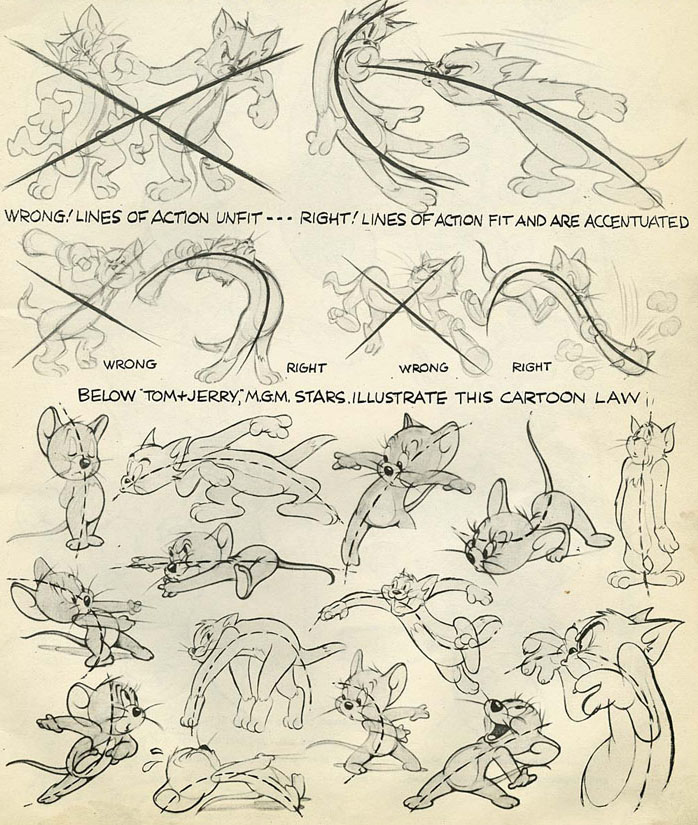
SMEARS, one of the spiciest and most important ingredient for cartoon animation. Great resource for Smear, Multiple frames from all kind of animation! Blog was created by Micael J. Ruocco.
Animation Tips
Animation Tips & Tricks with Animator Rick O’Connor
“We are no Directors! We gotta work Together …” Wonderful animation tips by Rick O’Connor on animating in a production environment!
Demo Reels (Tips by Carlos Baena)
Really good read posted by Carlos Baena. He offer’s his perspective, tips and suggestions on creating a good looking demo reel that could land someone a nice job!
“Pixar is currently hiring animators and looking at Interns as well. I’ve looked at a bunch of student and industry demo reels this last month, and spoke with recruiters and supervisors regarding the subject as to what should be submitted/how/etc. So I thought it might be appropiate to pass something I wrote a while back along one more time. It’s important to be mindful of company recruiters. To treat them with respect as they devote many long hours overseeing student work. So these are a few tips on things to think about when creating a demo reel.
1) Do NOT try to make a one-size fits all demo reel. This works in small companies, but for the main studios it may hurt your chances more than anything else. Make your demo reel specific to the position and studio for which you are applying. If you’re applying as an animator to a big animation studio where departments are very specialized, then everything on the reel should say only “animation.” It should not say “texturing” or “lighting” or “modeling.”
2) You should NOT include everything you’ve worked on throughout the years. Keep it short. If you’ve been working in the industry for, let’s say, 10 or 20 years, and you include every single shot you’ve animated, your demo reel will not be a reel anymore, it’ll be a feature film that recruiters/supervisors will have to sit through. So keep the reel under a minute or two, even if that means not using all of it. Chances are that people, who are reviewing your reel, are looking at another hundred, as well. So, the easier you can make it for them, the better. You don’t want to bore them. Instead, they should see your strongest work (even if it’s only 30 seconds). Leave them wanting to see more.
3) Make the reel original on the inside, NOT on the outside. Human resources, along with actual animators, will be looking at your reel, and they don’t care about how fancy the outside package looks or what you include along with the reel and resume. From key chains to toys, I’ve seen people include all kinds of things with their reels that do not relate to their animation skills. Put all of your originality into the actual animation content. Make it fun and original for people to watch, but don’t overdo it.
4) Do NOT include stuff that is too distracting, whether it’s music or fancy titles. If you have a reel with a dialogue animation test, and the music is too loud for people to hear the line the character is saying, or you have this mega-loud techno music going on throughout the whole thing, it will conflict with the purpose of the reel, which is to show your animation skills as clearly and simply as you can. Everything else should be secondary.
5) Do NOT include stuff that other people have animated. Be very clear and honest about what you have done. The industry is very small, people go from company to company and they are very familiar with other people’s work. Always include a credit list of the shots on the reel and what you animated for them. In the event that a shot is actually shared by two or more animators, you should clarify the work that you did.
6) Bring your own personality to the reel. Ultimately many people can learn the techniques. What’s interesting to see and what recruiters look for, is also the personality, the actor behind the reel. Don’t include things/tests/shots that are basically based on what other people have animated. We don’t want to see a “Pixar” reel. Instead, we are looking for the talented actor that can help Pixar (or any studio for that matter) make our movies more distinctive.
7) Find out what to submit and how. In the case of Pixar, go through the site and find out exactly what they need from you before you apply. This applies to any studio. Chances are, they may need you to submit a form before you send anything in some cases, or they may ask you to send your portfolio in a particular way or format.
8) Label your Disc/Case. In talking to one of our main recruiters, this seems to be an issue. If they like your work, but the contact information is only on the resume, and this gets lost in the pile of other reels, there is no way they’ll be able to contact you. So label everything. Put at least name, phone number and email address on the case and disc. Even if it’s with a sharpie.
You can also label it at the beginning/end of the actual content.
9) Be respectful with the people looking at your work. It doesn’t help you and your case if as soon as the Studio gets your reel, you call/email the recruiters/animators a dozen times a day. Be considerate with their time, and most important, treat them with respect. They are here to help you and their job is not easy as they have hundreds of reels to go through. So keep it in mind if you send a reel, and you don’t hear from them inmediately.
I hope this helps.
Carlos.
Source Link : http://www.carlosbaena.com/
Great Post on Posing
Here comes a great post on posing, staging, line of action and silhouette! Enjoy 🙂
Click Here for the link!
Making Animatable Pivot: Part 2
OK, here comes the 2nd part of creating an Animated Pivot by a good friend of mine. In this post he describes on how to actually go ahead on setting up a pivot controller with a bit of maths involved. The offset part is still a bit tricky and will be described in Maulik’s up coming post 🙂
Squiggle Line Tutorial
Here is a really nice and handy little tutorial by Keith on creating squiggly cartoony line art render for your 3D image.
Here is the tutorial link on Keith’s blog post 🙂 Squiggle Line Tutorial
How to Animate a Rolling Cube
You will use the properties of a primitive cube’s pivot point to animate it rolling on its edges. This process will involve the use of the Channel Control window to make certain attributes keyable. Once they are keyable, they will be available in the Channel Box for you to set keys and edit their value. In this lesson, you will also use the Graph Editor to refine the animation curves to get exactly the kind of motion that you need.
STEP ONE
Place a primitive poly cube into the scene and scale it to X=2, Y=2 and Z=2.
Select the Move tool and place the front of the cube at 0 along the Z axis (Z=-1).
Press the Insert key to go into edit mode and then move the pivot point to the middle of the cube’s front bottom edge.
You may want to use grid snapping to help you position the pivot.
Now press the Insert key to return to the Move tool then move the cube to the origin. (Y=1)
STEP TWO
Select Display -> Transform Display -> Local Rotation Axes and Rotate Pivots. These icons will help you visualize these components as you begin animating the pivot.
STEP THREE
Select Window -> General Editors -> Channel Control and select the following non-keyable attributes:
Rotate Pivot Translate X
Rotate Pivot Translate Y
Rotate Pivot X
Rotate Pivot Y
Use the Move button to make them keyable attributes. They will now appear in the Channel Box.
STEP FOUR
With the cube selected, set a key for Z rotation at frame 1.
Go to frame 10 then set Rotate Z to -90 and set another key.
STEP FIVE
Return to frame 1. Select the Rotate Pivot Translate X, Rotate Pivot Translate Y, Rotate Pivot X, and Rotate Pivot Y in the Channel Box then use your RMB to choose Key Selected.
STEP SIX
Go to frame 10.
Open the Attribute editor and select the pCube tab.
Expand the Pivots section.
Expand World Space section.
Set World Rotate X Pivot to 2. You should notice that the pivot moves to the front of the cube. Now you can continue rotating the cube.
In the Channel Box, set a key for the Rotate Pivot Translate X, Rotate Pivot Translate Y, Rotate Pivot X, and Rotate Pivot Y channels.
Editing the World Rotate Pivot in the Attribute Editor affects these four attributes therefore they must all be keyed.
STEP SEVEN
Go to frame 20.
Set another linear key frame for a Rotate Z to -180. Set the World Rotate Pivot to 4 then set keys for the four pivot channels in the Attribute editor.
If desired, keep rotating the cube and moving the pivot using the steps outlined above. If you playback the animation at this point, the roll of the cube will not seem correct. You need to change the animation curve tangents for the pivot attributes.
STEP EIGHT
The incorrect motion is because the pivot point needs to stay in one location for 10 frames then jump to its new location.
Open the Graph Editor.
Select the four pivot action curves
Select Tangents -> Stepped.
This will create the desired results.
Understanding Animatable Pivot
Really useful and informative post by Maulik about understanding and creating an animated pivot system. He guides you through the logic and maths behind creating this system.
Basically if you ever tried creating an animated pivot control, you will notice that once the object has been rotated and it’s rotatePivot point has been shifted and repositioned; once the object get translated we see some weird transformation. These unwanted transformation can be fixed by calculating the offset values in the rotatePivotTranslate matrix.
To give you a better idea on this please take a look at this little tutorial post 🙂
Also, Maulik has been working on this offset solution to create a real time animated pivot which you can find in his blog. Below is the link … and a big thanks to Maulik 🙂
Making Animatable Pivot


